This blog cover how to Integrate CI/CD BitBucket with Cypress and how we do end-to-end testing with Bitbucket and Cypress
Bitbucket Pipelines is an integrated CI/CD service built into Bitbucket. It allows you to automatically build, test, and even deploy your code based on a configuration file in your repository. Essentially, we create containers in the cloud for you. Inside these containers, you can run commands (like you might on a local machine) but with all the advantages of a new system, customized and configured for your needs.
Why Bitbucket
Easy configuration and setup
There are no CI servers to set up, user management to configure, or repos to synchronize. Just enable Pipelines with a few simple clicks and you’re ready to go.
Support most of the platform
Build and test with any language or platform including Java, JavaScript, PHP, Ruby, Python, .NET Code, and more.
A unified experience b/w between multiple applications.
Stop jumping between multiple applications. Manage your entire development workflow within Bitbucket, from code to deployment.
Configuration as code
Store and manage your build configurations in a single bitbucket-pipelines.yml file.
Pre-Condition
User already logged into Bitbucket after Sign-up
Set Up Bitbucket
Step 1
Open the Url to create the Repository

Step 2
Enter the project name and Repository name.

Once all detail is entered below screen is open after the final submission

Step 3
Clone the project in the local environment and set up Cypress
Installing Cypress
Create a folder and Generate package.json
- Create a project, here naming it Cypressv.10_Bitbucket
- Use the npm init command to create a package.json file
Install Cypress
To install Cypress, still, in the project folder, run > npm install cypress — save-dev
Once installed, Cypress version 10.9.0 is reflected as seen below

Step 4
Once Cypress is installed Push the code in bitbucket

Step 5
Configure your first pipeline
There are two ways to configure your pipeline: you can either directly write the YAML file or you can use the UI wizard provided by Bitbucket. The steps below will guide you through the Pipelines configuration wizard.
Step 5.1
In the Pipelines tab from the left Click on “Create your first pipeline”


Step 5.2
Once you choose a template, you will land in the YAML editor where you can configure your pipeline.

Click on RECOMMENDED Template i.e “Starter pipeline” and provide the .yml file attached below
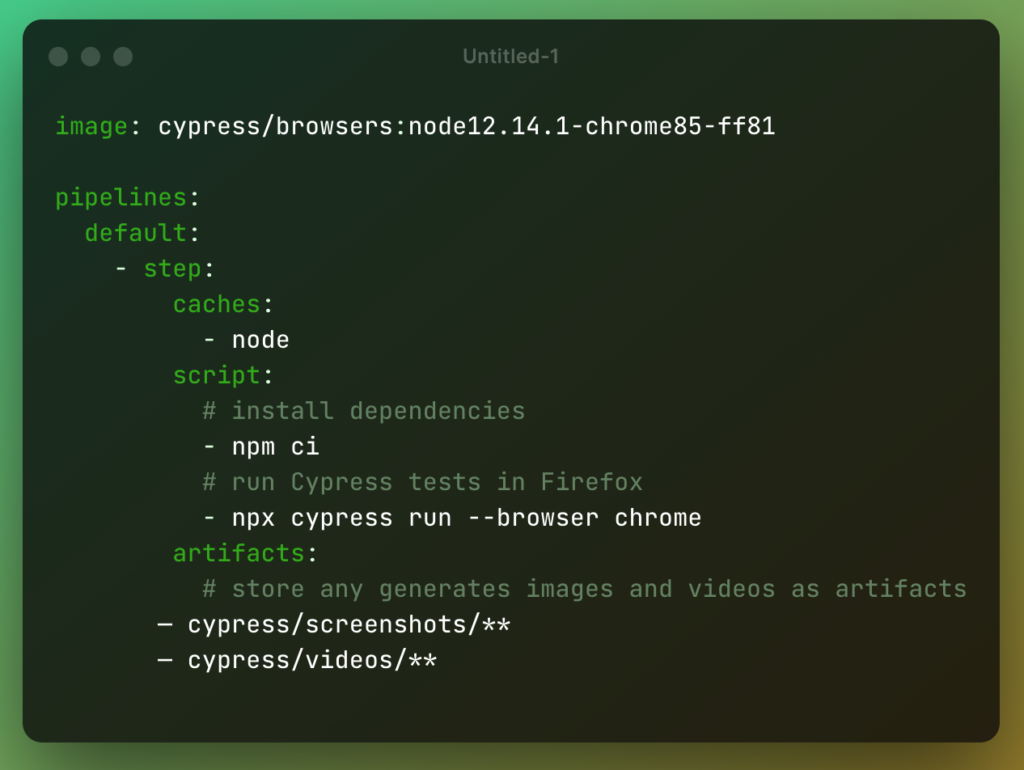
Update the above .Yml from the below code
image: cypress/browsers:node12.14.1-chrome85-ff81
pipelines:
default:
— step:
caches:
— node
script:
# install dependencies
— npm ci
# run Cypress tests in chrome
— npx cypress run — browser chrome
artifacts:
# store any generated images and videos as artifacts
— cypress/screenshots/**
— cypress/videos/**

How this bitbucket-pipelines.yml works:
A pipeline is defined using a YAML file called bitbucket-pipelines.yml, which is located at the root of your repository
- On push to this repository, this job will provision and start a Bitbucket Pipelines-hosted Linux instance for running the pipelines
- The code is checked out from our Bitbucket repository.
- Finally, your scripts will:
- Install npm dependencies
- Start the project web server (npm start)
- Run the Cypress tests within our GitHub/Bitbucket repository in the chrome browser
Step 6
Take the pull of the code in your local directory so that the .yml file is added
Step 7
Add some Cypress test cases and as the cypress code is pushed pipeline start executing

Step 8
Run Pipeline: Click on Run pipeline

Keep Pipeline ‘default’ as selected and the master branch is selected
default: mean pipeline run using bitbucket-pipelines.yml)

As we click on Run pipeline is start

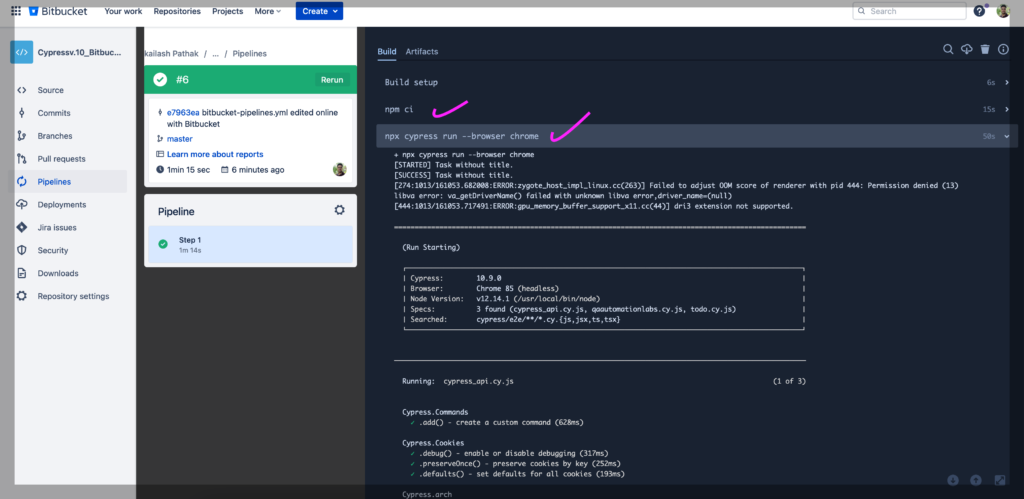
In the below screenshot, we can see the test case start executing


Report
Below report of the final test case execution. Here we can see all the test cases are passed.

